Chocolate Hazelnut Tart with Marshmallow Topping

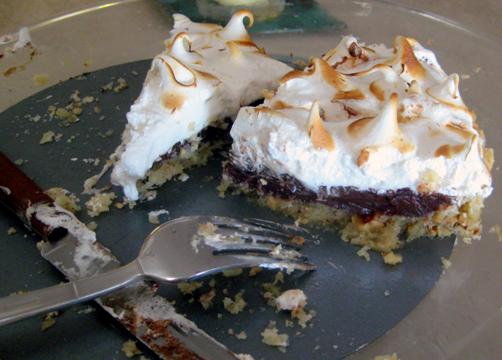
I am truly starting to believe that this is the devil in cake form. It’s going to be the death of me, or, at the very least, the fatness of me. It’s just so good that I can’t leave it alone. I should just throw it away and dump coffee grounds over the top, but, shamefully, I can see digging through for more fancy s’mores-esuqe goodness. Anyone remember this scene from Sex and the City?

I found the original recipe on What’s Cookin’ Chicago?, and made it this summer. While it was delicious, I can’t say I was the biggest fan of the meringue topping. It just wasn’t my thing, and doesn’t keep all that well, so you really have to eat it the same day it’s topped. If you like meringue, try it, otherwise, go with my changes noted below and enjoy you decadent chocolate tart with a thick layer of toasted marshmallow. Yum!


Crust:

  • 1/3 cup Hazelnuts
  • 1 stick unsalted Butter at room temperature + more for greasing pans
  • ½ cup Powdered Sugar
  • 2 tsp Frangelico liqueur
  • ¼ tsp Salt
  • ¾ cup Flour

Ganache:

  • 1 cup Heavy Whipping Cream
  • 1 Tbsp Unsalted Butter
  • 1/8 tsp Salt
  • 1 Vanilla Bean, halved lengthwise
  • 7 oz Bittersweet Chocolate, finely chopped

Marshmallow Frosting:

  • 4 large Egg Whites, room temperature
  • 1 cups Sugar
  • ¼ tsp. Cream of Tartar
  • 1 tsp. Vanilla Extract

Directions:

Hazelnut Crust:

  1. Preheat the oven to 350 degrees. With your fingers, butter four 4 3/8-inch, 1-cup capacity tartlet pans, using about 1 generous tablespoon softened unsalted butter total.
  2. Arrange the hazelnuts on a baking sheet in a single layer and toast them in the oven for 7-9 minutes, until golden brown and aromatic. (Alternatively, you can place them in a dry nonstick skillet and toast the hazelnuts on the stovetop.) Immediately gather the nuts in a kitchen towel and rub vigorously to remove the skins. Chop the nuts and set aside.
  3. Using a mixer fitted with a paddle attachment, cream the butter and sugar in a large bowl at medium-high speed until fluffy, about 3 minutes. Mix in the Frangelico liqueur and salt. Gradually add the flour and combine on low speed until just incorporated. Add the hazelnuts and mix on low speed just until incorporated. Form the dough into a ball, wrap in plastic wrap, and refrigerate for 30 minutes.
  4. Remove the dough from the refrigerator, divide into 4 equal portions, and press into the prepared pans, making sure the dough comes up to the top edge of the pans.
  5. Bake 12-15 minutes, until golden brown. remove from the oven and cool for 30 minutes on racks. (Don’t worry if the tart bottoms look wrinkly.) At this point, the crusts can be cooled and stored in airtight containers for up to 2 days.

Ganache:

  1. In a heavy-bottomed saucepan, combine the cream, butter, salt and vanilla bean. Bring to a gentle boil over medium heat.
  2. Remove the pan from the heat and take out the vanilla beak halves. Using a paring knife, scrape out the vanilla pad’s tiny black beans and add them to the cream mixture.
  3. Put the chopped chocolate in a large bowl and pour the hot cream over it. Let stand for 5 minutes, then whisk until smooth.
  4. Spoon the ganache into the tart shells, dividing it evenly among them. Refrigerate the tarts at least 30 minutes, or until the ganache is set.

Marshmallow Frosting:

  1. Combine the egg whites, sugar and cream of tartar in the top of a double boiler, or set your clean, dry mixer bowl over simmering water, to avoid dirtying two bowls. Heat the mixture, whisking frequently, until it reaches 160° F with an instant-read thermometer, or the mixture no longer feels grainy between your fingers.
  2. Transfer the mixture to the bowl of an electric mixer fitted with the whisk attachment. Whisk starting at low speed and gradually increasing to medium-high speed until stiff, glossy peaks form. Mix in the vanilla until combined.
  3. Frost cooled cupcakes as desired. Brown with a kitchen torch and garnish with chocolate and graham cracker segments (optional).

Caramel Pecan Cheesecake

I’m sure I’ve mentioned it before, but Jim loves cheesecake. I’ve always been so-so about it, because it’s one of those things that’s either really good or really bad. To me, there’s really no in-between. I tend to like the New York style cheesecakes that aren’t too sweet, but are quite rich and have a nice cream cheesy flavor. That isn’t to say that they can’t have anything else going on, but, if your favorite is the super sweet no-bake style on the Philadelphia box, we won’t have to worry about fighting over the last bite, you can have it.

I’ve had a little luck trying a few recipes on Jim that I think he enjoyed, but when I saw this recipe on the King Arthur website, I knew we’d have a winner. I mean, salted caramel combined with a delicious cheesecake? How could it not be a winner? It didn’t disappoint in the least. Not overly sweet with great flavors of caramel and nuts. I highly recommend giving it a try if you’re in the market for a delicious dessert to share.


Ingredients

Crust:

  • 1 cup King Arthur Unbleached All-Purpose Flour
  • ¾ cup pecan meal or ground pecans
  • 3 tablespoons sugar
  • ½ teaspoon salt
  • ½ teaspoon cinnamon
  • ½ cup unsalted butter, softened

Filling:

  • 1 ½ pounds (three 8-ounce packages) cream cheese, at room temperature
  • 1 ½ cups brown sugar
  • 2 teaspoons vanilla extract
  • 1 /4 teaspoon salt
  • 1/8 teaspoon Pralines and Cream Flavor, optional
  • 4 large eggs
  • ½ cup + 2 Tbsp King Arthur Touch of Gold Caramel Sauce or your favorite
  • ½ cup cream or half & half

Directions:

Crust:

  1. Preheat the oven to 375°F. Lightly grease a 9″ springform pan.
  2. Mix the crust ingredients till crumbly. Press onto the bottom and 1″ up the sides of the prepared pan; prick with a fork.
  3. Bake the crust for 10 to 15 minutes, till light golden brown. Remove it from the oven; reduce oven temperature to 325°F.

Filling:

  1. Mix the cream cheese, brown sugar, vanilla, salt, and flavor at low speed until smooth, scraping the bottom and sides of the bowl.
  2. Add the eggs one at a time, scraping the bowl between additions.
  3. Stir in the ½ cup of caramel sauce and cream.
  4. Pour the filling into the crust and smooth. Drizzle the remaining caramel sauce over the top of the cake, and drag a toothpick through to swirl.
  5. Bake for 40 minutes. Reduce the heat to 300°F and bake 15 minutes more, until the edges of the cake are set, and an instant-read thermometer inserted 2″ from the edge reads 170°F.
  6. Turn off the oven, crack the door, and let the cake cool in the oven for 1 hour.
  7. Remove the cake from the oven, and cool it at room temperature for 1 hour.
  8. Refrigerate for 8 hours (or overnight) before serving.

S’mores Mini Cheesecakes

I have been wanting to make this recipe from Bon Appétit ever since receiving the June issue. Unfortunately, I haven’t had a reason to make it, and contrary to Jim’s thoughts, I really didn’t need a fully cheesecake staring me in the face every time I walked into the kitchen. This is why I was happy when Jim’s mom asked me to make a dessert for her annual employee appreciation picnic. Now, she asked for cupcakes, and I made those too, along with a peach and blackberry almond crisp. Yes, that’s right, asking me for a dessert pretty much means I’ll go overboard and make 3.

I only made 3 changes to the original recipe:

  1. Made minis rather than a full-sized cake. Baking times for both are noted below.
  2. Used dark chocolate instead of milk. I just like dark chocolate better.
  3. Used a recipe for a Marshmallow Frosting I’ve had success with before rather than making their topping, as I didn’t want to buy a bag of marshmallows to only use 12 of them.

Now, I can’t tell you if they were good or not, as I didn’t get to try one. All 22 of them left the kitchen before I was able to get a taste. I will take that fact, and the fact that people kept smiling and nodding their heads approvingly when I asked how they were, as a sign of success and a reminder that I may have to make these again sometime, even if it’s as a half batch that stares us in the face each time we walk into the kitchen. J


Ingredients:

Crust:

  • 2 cups Graham Cracker Crumbs
  • 3 Tbsp Sugar
  • 1 stick Unsalted Butter, melted

Filling:

  • 9 ounces high quality Dark Chocolate, chopped
  • 2 8-ounce packages Cream Cheese, room temperature
  • ¾ cup Sugar
  • ¼ tsp Salt
  • ¾ cup Heavy Whipping Cream
  • 3 large Eggs

Marshmallow Frosting:

  • 8 large Egg Whites, room temperature
  • 2 cups Sugar
  • ½ tsp. Cream of Tartar
  • 2 tsp. Vanilla Extract

Directions:

Crust:

  1. Position rack in center of oven and preheat to 350°F.
  2. Mix crumbs and sugar in medium bowl. Add melted butter; stir until mixture is evenly moistened.
  3. Drop about 1 tablespoon of the graham cracker mixture in the bottom of each cupcake liner and press down to line the bottom. It’s been noted that the bottom of a squeeze bottle is the perfect size to do this job neatly and quickly.
  4. Bake for 5 minutes.

For a full-sized cheesecake: Press onto bottom of 9-inch-diameter springform pan with 2 3/4-inch-high sides. Bake until set, about 12 minutes.

  1. Reduce oven temperature to 325°F.

Filling:

  1. Stir chocolate in top of double boiler set over barely simmering water until smooth. Remove from over water and cool to lukewarm, stirring occasionally. You can also melt the chocolate in the microwave by heating for 30 seconds at a time at 50% power.
  2. Combine cream cheese, sugar, and salt in processor and blend until smooth. With motor running, add whipping cream through feed tube and process just until blended. With motor running, add melted chocolate, then add eggs 1 at a time, blending and scraping down sides after each addition until mixture is smooth. Pour batter over crust in pan.
  3. Bake cake until outer edge is slightly puffed and cake is barely set in center (center will look shiny and move slightly when pan is gently shaken), about 22 minutes (about 55 minutes for a full-sized cake). Transfer cake to rack. Run small sharp knife around cake to loosen. Chill uncovered until cold, 8 hours or overnight. DO AHEAD Can be made 2 days ahead. Cover and keep refrigerated.

Marshmallow Frosting:

  1. Combine the egg whites, sugar and cream of tartar in the top of a double boiler, or set your clean, dry mixer bowl over simmering water, to avoid dirtying two bowls. Heat the mixture, whisking frequently, until it reaches 160° F with an instant-read thermometer, or the mixture no longer feels grainy between your fingers.
  2. Transfer the mixture to the bowl of an electric mixer fitted with the whisk attachment. Whisk starting at low speed and gradually increasing to medium-high speed until stiff, glossy peaks form. Mix in the vanilla until combined.
  3. Frost cooled cupcakes as desired. Brown with a kitchen torch and garnish with chocolate and graham cracker segments (optional).

Mixed Berry Cobbler Pie Bars

This is another of those recipes that came into my inbox that immediately made me start to drool. Joy the Baker posted these on her blog back in May, and I knew they would need to make an appearance at the height of berry season. I added them to the menu for Jim’s birthday party, and I was overwhelmed with how delicious they were. They work with a variety of berries, but, as Joy notes, I would stick with the less juicy varieties, as you want a crisp, not soggy, crust for your bars. I will definitely be making these again.


Ingredients:

Crust & Topping:

  • 3 cups all-purpose flour
  • 1 1/2 cups sugar
  • 1/4 teaspoon salt
  • 1 1/2 cups (3 sticks) chilled unsalted butter, cut into cubes
  • zest of two lemons

Berry Filling:

  • 4 large eggs
  • 2 cups sugar
  • 1 cup sour cream
  • 3/4 cup all-purpose flour
  • pinch of salt
  • 2 (16-ounce) packages frozen mixd berries, defrosted and drained

    *You can also use 6 cups of fresh berries, or 1 (16-ounce) package frozen berries and 3 cups of fresh berries. If you’re using frozen berries, be sure to defrost and drain the excess liquid. Place the frozen berries on a plate in the refrigerator overnight. They’re defrosted and ready for bar baking!

Directions:

Crust & Topping:

  1. Preheat the oven to 350. Grease a half sheet baking pan (12×17-inch) with butter or cooking spray and set aside. If you use a 9×13-inch baking pan you’ll have thicker bars.
  2. Zest two lemons. Measure out the sugar onto a clean work surface. Rub the lemon zest into the sugar with a bench scraper or the back of a spoon. Rubbing the zest into the sugar will release oils from the zest and create a lemon scented sugar.
  3. Combine lemon sugar, flour, salt and butter in an electric mixer fit with a paddle attachment. Beat the ingredients on medium speed until the mixture looks dry and crumbly.
  4. Reserve 1 1/2 cups of the crust mixture to use as the topping. Press the remaining mixture into the bottom of the pan. Bake the crust for 12 to 15 minutes until it is golden brown. Let cool for 10 minutes while you make the filling.

Berry Filling:

  1. Whisk the eggs in a large bowl. Add the sugar, sour cream, flour and salt.
  2. Gently fold in the berries. Spoon the mixture evenly over the crust. You may have to distribute the berries evenly around.
  3. Sprinkle the reserved crust mixture evenly over the filling. Bake for 45 to 55 minutes until the top is lightly browned.
  4. Cool for 1 hour before slicing.

Confetti Cupcakes with Vanilla Buttercream

I was asked to make these cupcakes, as well as some Margarita Cupcakes, for a friend’s sister’s daughter’s first birthday party. Did you follow that one? The décor for the party was polka dots in bright colors, and they used this paper to make the invitations and party favors:


Not only was I excited to help them with the baking for the party, but I was also excited to have an excuse to look for some new baking and decorating supplies. Now I have huge containers of large and small confetti sprinkles, and rainbow nonpareils to use for future projects.

For these cupcakes, I folded in rainbow nonpareils into a yellow cupcake batter. I think I’ll try using the confetti sprinkles next time, as the nonpareils bled a little, and the final cupcakes turned out a little more marbled than I would have liked. I think the “client” was please with the final result, and I know that Carter and Jim have been pleased with the leftovers.


Ingredients:

Cupcakes:

  • 3 cups Cake Flour, not self-rising
  • 1 ½ cups All-Purpose Flour
  • ¾ tsp Baking Soda
  • 2 ¼ tsp Baking Powder
  • 1 ½ tsp Kosher Salt
  • 2 ¼ sticks Unsalted Butter, room temperature
  • 2 ¼ cups Sugar
  • 5 large whole Eggs plus 3 Egg Yolks, room temperature
  • 2 cups Buttermilk, room temperature
  • 2 tsp Vanilla Extract
  • ¼ cup Jimmies or Sprinkles (depending on what people call them where you are. )

Frosting:

  • 2 ½ sticks Unsalted Butter, softened
  • 4 cups Confectioners’ Sugar
  • 1/8 Tbsp Salt
  • 1 Tbsp Vanilla extract
  • 2 Tbsp Heavy Cream
  • White-White Icing Color, as needed

Directions:

Cupcakes:

  1. Preheat oven to 350 degrees. Line standard muffin tins with paper liners.
  2. Sift together both flours, baking soda, baking powder, and salt.
  3. With an electric mixer on medium-high speed, cream butter and sugar until pale and fluffy. Reduce speed to medium. Add whole eggs, one at a time, beating until each is incorporated, scraping down sides of bowl as needed. Add yolks, and beat until thoroughly combined. Reduce speed to low.
  4. Add flour mixture in three batches, alternating with two additions of buttermilk, and beating until combined after each. Beat in vanilla.
  5. Fold in colored sprinkles until just combined. Be sure not to over mix, as color may bleed into batter.
  6. Divide batter evenly among lined cups, filling each three-quarter full. Bake, rotating tins halfway through, until cupcakes spring back when lightly touched and a cake tester inserted in centers comes out clean, about 20 minutes for full sized cupcakes and 11 minutes for minis.
  7. Transfer tins to wire racks to cool 10 minutes; turn out cupcakes onto racks and let cool completely. Cupcakes can be stored overnight at room temperature, or frozen up to 2 months, in airtight containers.

Frosting:

  1. In standing mixer fitted with whisk attachment, beat butter at medium-high speed until smooth, about 20 seconds.
  2. Add confectioners’ sugar and salt; beat at medium-low speed until most of the sugar is moistened, about 45 seconds.
  3. Scrape down bowl and beat at medium speed until mixture is fully combined, about 15 seconds; scrape bowl, add vanilla and heavy cream, and beat at medium speed until incorporated, about 10 seconds.
  4. If the mixture isn’t as bright of a white as you would like at this point, due to the yellow of the butter and tint of the vanilla, add a few drops of white-white icing color.
  5. Increase speed to medium-high and beat until light and fluffy, about 4 minutes, scraping down bowl once or twice.

Margarita Cupcakes

When I was looking for a recipe for a margarita cupcake, I asked the ladies of a message board I frequent for their recommendation, and I got multiple replies pointing me to Confections of a Foodie Bride’s recipe for Margarita Cupcakes. I didn’t change anything about the cupcakes themselves, but I did brush them with margarita simple syrup to up the margarita flavor, and keep them moist. Also, the flavor in the original buttercream was a little too subtle for me, so I increased the quantities of lime juice and tequila, and added some triple sec as well, for a truer margarita essence. Finally, what’s a margarita without salt? I wanted a slight saltiness to the final cupcake, just like when you’re sipping an ice cold margarita, so I sprinkled the tops with a combination of sanding sugar and salt, and topped with a lime slice.


Ingredients:

Lime Cupcakes:

  • 3 cups flour
  • 1 Tbsp baking powder
  • 1/2 tsp salt
  • 1 cup (2 sticks) unsalted butter, at room temp
  • 2 cups sugar
  • 4 eggs, at room temp
  • Zest of 3 Limes
  • 3 oz Lime Juice, about 3 to 4 Limes or bottled juice
  • 1 cup buttermilk

Margarita Simple Syrup*:

  • 1 cup Sugar
  • ¼ cup Tequila
  • ¼ cup Triple Sec
  • ½ cup Lime Juice, fresh or bottled

Margarita Buttercream:

  • 2 cups sugar
  • 8 egg whites
  • 3 sticks butter, room temperature
  • 3 ½ Tbsp Lime Juice
  • 2 Tbsp Tequila
  • 1 Tbsp Triple Sec

Decoration:

  • Green Sanding Sugar
  • Coarse Margarita Salt
  • Limes, sliced thinly and then into halves

Directions:

Lime Cupcakes:

  1. Preheat oven to 325. Prepare muffin tins with paper liners or baking spray.
  2. Whisk flour, baking powder and salt together and set aside. Cream butter and sugar on a high until pale, light, and fluffy (about 5 minutes). Add eggs one at a time, mixing thoroughly before adding the next one. Add lime zest and lime juice. Turn mixer to the low. Add the dry ingredients in three batches, alternating with the buttermilk in two batches. Mix only until just incorporated.
  3. Fill each muffin cup ~3/4 full. Bake for 25 minutes or until a skewer shows only moist crumbs attached, rotating the pans at the halfway point. Allow cupcakes to cool completely in the pans before removing.

Margarita Simple Syrup:

  1. While cupcakes are baking, bring sugar, tequila, triple sec, and lime juice to a simmer and allow to cool.
  2. When syrup and cupcakes have cooled, brush tops with margarita syrup.

Margarita Buttercream:

  1. Place the stand mixer bowl over a simmering pot of water; the bottom of the bowl should not touch the water. Whisk the sugar and egg whites until the sugar is dissolved and the mixture registers 160 degrees with a candy thermometer, or you cannot feel any grains of sugar when you rub the mixture in-between you thumb and forefinger.
  2. Place bowl on the stand mixer fitted with the whisk attachment and whisk on high speed until the mixture is cool and holds stiff, glossy peaks, approximately 10 minutes.
  3. Change to the paddle attachment and beat in one tablespoon of butter at a time on medium. The mixture might appear curdled but keep going, it will pull back together.
  4. Add lime juice, tequila, and triple sec. Increase speed to high and beat until the frosting reincorporates and is smooth and fluffy.

Decoration:

  1. Mix 2 parts sanding sugar with 1 part coarse salt.
  2. After frosting cupcakes, sprinkle with about ¼ to ½ teaspoon of the sugar/salt mixture, and press in a lime slice.

*Extra margarita simple can be used to make a delicious and refreshing “Mock-arita”: Fill a glass with ice, pour in 3 oz of margarita simple syrup, top with Sprite and a slice of lime.

Strawberry Lemonade Cupcakes

I have been looking for a new cupcake to make for Mothers’ Day. Personally, I would like something deep, dark, rich, and chocolaty like these, but I figure I should appeal to the masses on this one. Given that it’s May, and finally above 50 here in Wisconsin, I started thinking about warm weather and summer, and lemonade seemed like the perfect flavor.

This recipe, from Confections of a Foodie Bride, brought it over the top with the addition of fresh strawberries in the buttercream topping off the lemonade cupcakes. I’ve adapted it slightly by switching from a Swiss meringue buttercream to a basic buttercream. I also brushed the top of my cupcakes with lemon syrup to keep them from drying out and adding another layer of lemon flavor. Finally, I added some gel food coloring to both the cupcakes and the frosting to really make them pop.

These were a total hit, despite the fact that by the time I was ready to make these cupcakes the weather had turned and we were told to expect snow, and I’m already dreaming up ways to alter the flavors into different combinations: cherry/lime, raspberry/orange, blackberry/grapefruit …


Ingredients:

Lemonade Cupcakes:

  • 3 cups Flour
  • 1 Tbsp Baking Powder
  • ½ tsp Salt
  • 1 cup, 2 sticks, Unsalted Butter, at room temp
  • 2 cups Sugar
  • 4 Eggs, at room temp
  • Zest of 3 Lemons
  • 2 Tbsp Fresh Lemon Juice
  • 1 tsp Vanilla
  • 1 cup Buttermilk
  • Lemon Yellow Gel Food Coloring, optional
  • 1 cup Lemon Juice
  • 1 cup Sugar

Strawberry Buttercream Frosting:

  • 16 Tbsp Unsalted Butter, at room temperature
  • 8 to 9 cups Powdered Sugar, sifted
  • 4 Tbsp Lemon Juice
  • Zest of 2 Lemons
  • ¾ cup Strawberry Puree, from about 6 medium, hulled strawberries
  • Red Gel Food Coloring, optional

Directions:

Lemonade Cupcakes:

  1. Preheat oven to 325. Prepare muffin tins with paper liners or baking spray.
  2. Whisk flour, baking powder and salt together and set aside. Cream butter and sugar on a high until pale, light, and fluffy, about 5 minutes. Add eggs one at a time, mixing thoroughly before adding the next one. Add lemon zest, lemon juice, and vanilla. Turn mixer to the low. Add the dry ingredients in three batches, alternating with the buttermilk in two batches. Mix only until just incorporated.
  3. Fill each muffin cup about 3/4 full. Bake for 25 minutes or until a skewer shows only moist crumbs attached, rotating the pans at the halfway point. Allow cupcakes to cool completely in the pans before removing.
  4. While cupcakes are baking, bring lemon juice and sugar to a boil and then allow to cool. When syrup and cupcakes have cooled, brush tops with lemon syrup.

Strawberry Buttercream Frosting:

  1. In standing mixer fitted with whisk attachment, beat butter at medium-high speed until smooth, about 20 seconds.
  2. Add 4 cups of the sugar; beat at medium-low speed until most of the sugar is moistened, about 45 seconds. Add 4 more cups of sugar and continue mixing until combined.
  3. Scrape down bowl and beat at medium speed until mixture is fully combined, about 15 seconds; scrape bowl, add lemon juice and strawberry puree ¼ cup at a time, and beat at medium speed until incorporated, about 10 seconds, between each addition.
  4. Increase speed to medium-high and beat until light and fluffy, about 4 minutes, scraping down bowl once or twice. If you notice the frosting isn’t as stiff as you would like, add in the last cup of sugar, beating on low until combined, and then finishing on high for 2 to 4 minutes.


Yields: 24 cupcakes

Mexican Sundaes with Dulce de Leche

This is barely a recipe. Honestly, I’m surprised I’m posting it, but the thing is, it’s kind of amazing. Here you have this ice cream sundae with this amazing caramel sauce and crunchy chips, and then you’re like, “whoa, what’s that?” Yeah, that’s right, your sundae is spicy. It’s never too overwhelming, because you have the cool of the ice cream and the sweet of the sauce, so it all works together. It’s good, I promise. You can find dulce de leche in most grocery stores now, look for it in the Latin aisle. Otherwise, it’s very easy to make your own, with the plus side being you can control how thick it will get by adjusting the cooking time.


Ingredients:

  • 2 to 3 Flour Tortillas
  • 2 Tbsp Sugar
  • 1 tsp Cinnamon
  • ½ tsp Chipotle or Chili Powder
  • ½ tsp Salt
  • Dulce de Leche*
  • Ice Cream

Directions:

  1. Preheat oven to 375. Cut tortillas into sixths. Place on a cookie sheet and sprinkle with sugar, cinnamon, chili powder, and salt. Bake for 8 minutes, and allow to cool on pan.
  2. Place 2 to 3 scoops of ice cream into serving bowls. Arrange tortilla chips around ice cream, about 3 to 4 per sundae. Top with dulce de leche and enjoy!

Strawberry Margarita Mini-Pies

This was the final piece of my Cinco de Mayo dinner, and I didn’t want to let the ball drop on dessert. We like our sweets, but I didn’t want anything too heavy after our enchiladas, so chocolate was out of the question. When I found this recipe on Annie’s Eats, I started to drool, but was concerned by the amount of dessert we would have if I followed the original instructions.

The solution? Cut the recipe in half and use my 4 inch springform pans instead of a 9 inch. One of these mini-pies was the perfect amount for the 2 of us to share, and was the perfect light compliment to our spicy and flavorful meal. Oh, and even better is the fact that we still have 2 more waiting for us in the freezer!

I did make one signifigant change to the original recipe by substituting pretzels in the crust. We really liked the salty sweet contrast of the final result. Now, if you wanted to make this into a 9 inch cake for a crowd, simply double all components of the recipe below, bake the crust for 3 to 5 minutes longer than the instructions below, and plan to make this a day ahead, as it turns out best if frozen overnight.


(No, the dessert pictured isn’t bite-sized; the strawberry on top is simply that huge!)

Ingredients:

Pretzel Crust:

  • 2 cups Pretzels
  • 3 Tbsp Sugar
  • 4 Tbsp Unsalted Butter, melted

Strawberry Margarita Filling:

  • 1 cup Fresh Strawberries, hulled and quartered
  • 3 Tbsp
  • ½ cup Sweetened Condensed Milk
  • 3 Tbsp Tequila, white
  • 2 Tbsp Triple Sec
  • Juice of 1 lime
  • Zest of one lime
  • 1 cup Heavy Cream

Garnish:

  • Fresh strawberries
  • Lime slices or wedges
  • Whipped Cream

Directions:

Pretzel Crust:

  1. Pre-heat the oven to 350. Line the bottom of 3 4″ springform pans with parchment paper. Butter the parchment, as well as the sides of the springform.
  2. Pulse pretzels in a food processor until finely ground. In a medium bowl combine the pretzel crumbs and sugar. Add the melted butter and toss with a fork until well combined.
  3. Divide the mixture between the springform pans and evenly cover the sides and bottom of the pan with the crumb.
  4. Bake for 10 minutes. Transfer to a wire rack to cool completely.

Strawberry Margarita Filling:

  1. Combine the strawberries, sugar, condensed milk, tequila, triple sec, lime juice and lime zest in the bowl of a food processor. Process until completely smooth, scraping down the sides as needed. Transfer to a large bowl.
  2. In the bowl of an electric mixer fitted with the whisk attachment, whip the heavy cream on high speed until stiff peaks form. Add one third of the whipped cream to the puree and gently fold in with a rubber spatula. Stir in the remaining cream.
  3. Pour the filling into the crust, cover, and freeze until firm, about 2 to 3 hours.

Serving:

  1. To remove the springform sides, wrap a towel soaked in hot water around the outside of the pan for 10-15 seconds. Carefully remove the sides of the pan.
  2. Before serving, garnish with fresh strawberries, lime slices, and whipped cream as desired.

Margarita Madeleines with Margarita Glaze

I was planning our Friday Night Fiesta, I’m so, so lame, and realized that we didn’t have anything to end our meal with. I actually started thinking about this in bed on Thursday night, and went to sleep dreaming of these Margarita Madeleines. I had made Amaretto Madeleines for Valentine’s Day and thought I could convert the flavors into include a citrus tequila tang.

I couldn’t be happier with how these turned out. Just the right balance of sour tangy lime and tequila flavors, with the sweetness of the glaze. I’ll have to see how else I work with and reinvent these little cookie cakes. I think my next venture will have to be with chocolate. They’re absolutely delicious, and I encourage you to try some very, very soon. This recipe makes exactly 2 dozen madeleines, which is perfect, as they really are best the day they are made.

Ingredients:

Madeleines:

  • 10 Tbsp Unsalted Butter, plus more for the pan
  • 2/3 cup Sugar
  • ½ tsp Salt
  • 3 Eggs, room temperature
  • 2 tsp Tequila
  • Zest of 1 Lime
  • 1 ¼ cup Flour
  • 1 tsp Baking Powder

Glaze:

  • 1 & ¼ cups Powdered Sugar, sifted
  • 3 Tbsp Whole Milk (or whatever you have on hand, lower fat will make a thinner glaze)
  • 1 Tbsp Tequila
  • 1 Tbsp Orange Liquor, i.e. Triple Sec, Grand Marnier, or Cointreau
  • Zest of 1 Lime

Directions:

Madeleines:

  1. Over medium heat, melt the butter in a saucepan. Set aside to cool to room temperature.
  2. Beat the sugar, salt and eggs several minutes until they are light yellow and thickened. Stir in the tequila and lime zest.
  3. Sift flour and baking powder together.
  4. Gently fold in the flour and butter into the sugar mixture in 3 additions each, alternating between the two. Refrigerate the batter for at least 45 minutes or up to 3 days.
  5. Preheat the oven to 375⁰ for “normal” pans, and at 350⁰ if using a dark one like mine. Brush the madeleine pan with melted butter.
  6. Fill the pans with 1 heaping tablespoon of dough per cookie. Bake 12 minutes until the edges are light brown.
  7. Let cool in the pan 5 minutes. Carefully remove from pan and let cool completely on a cooling rack.
  8. If making these in 2 batches, let the pan cool completely. Wipe out the cookie molds and re-coat with melted butter.

Glaze:

  1. Whisk to combine all of the ingredients.
  2. Place the madeleines on a cooling rack placed on a cookie sheet. (This will catch the glaze and make for easier clean-up.)
  3. Spoon glaze over the cooled cookies. Allow to set for at least 15 minutes before serving.